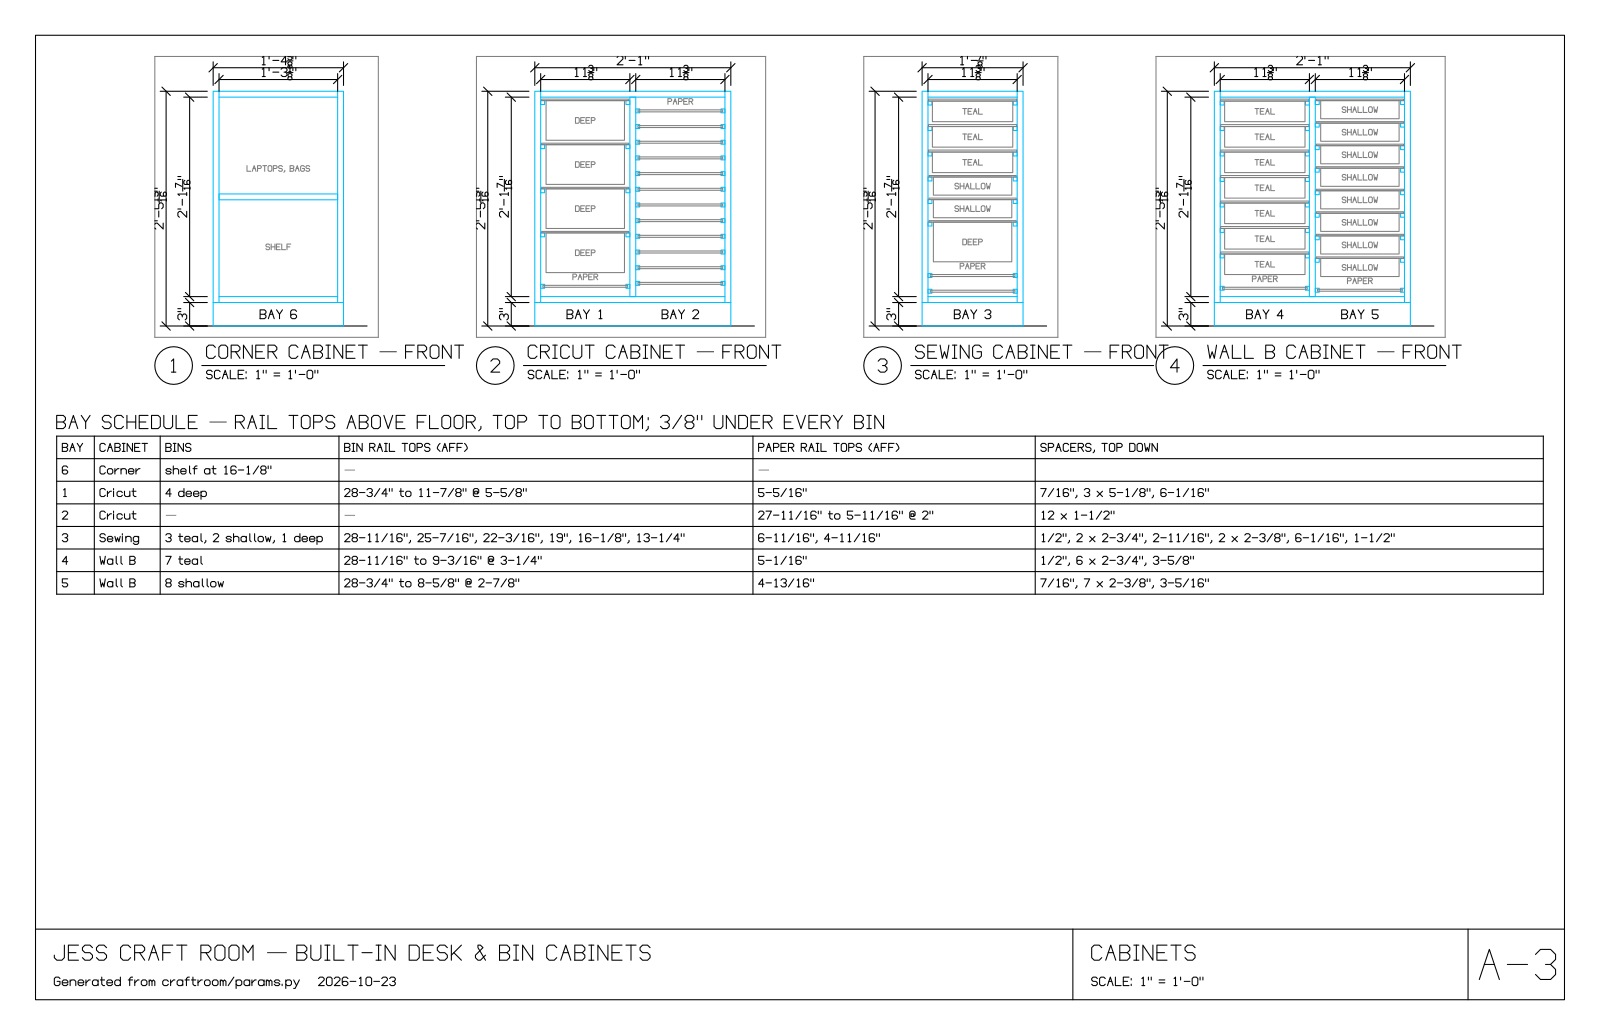
The bins came first. Jess had 25 of them, pulled from rolling craft carts: 10 teal, 10 shallow colored ones and 5 deep ones. They hang by a lip instead of sliding on a bottom, so the cabinets that hold them need no drawers at all, just pairs of 1⁄2 in.-square rails, printed rather than ripped. Every bay is 113⁄8 in. wide inside, which gives the teal bins 7⁄16 in. of lip on each rail and the colored ones 3⁄8 in.
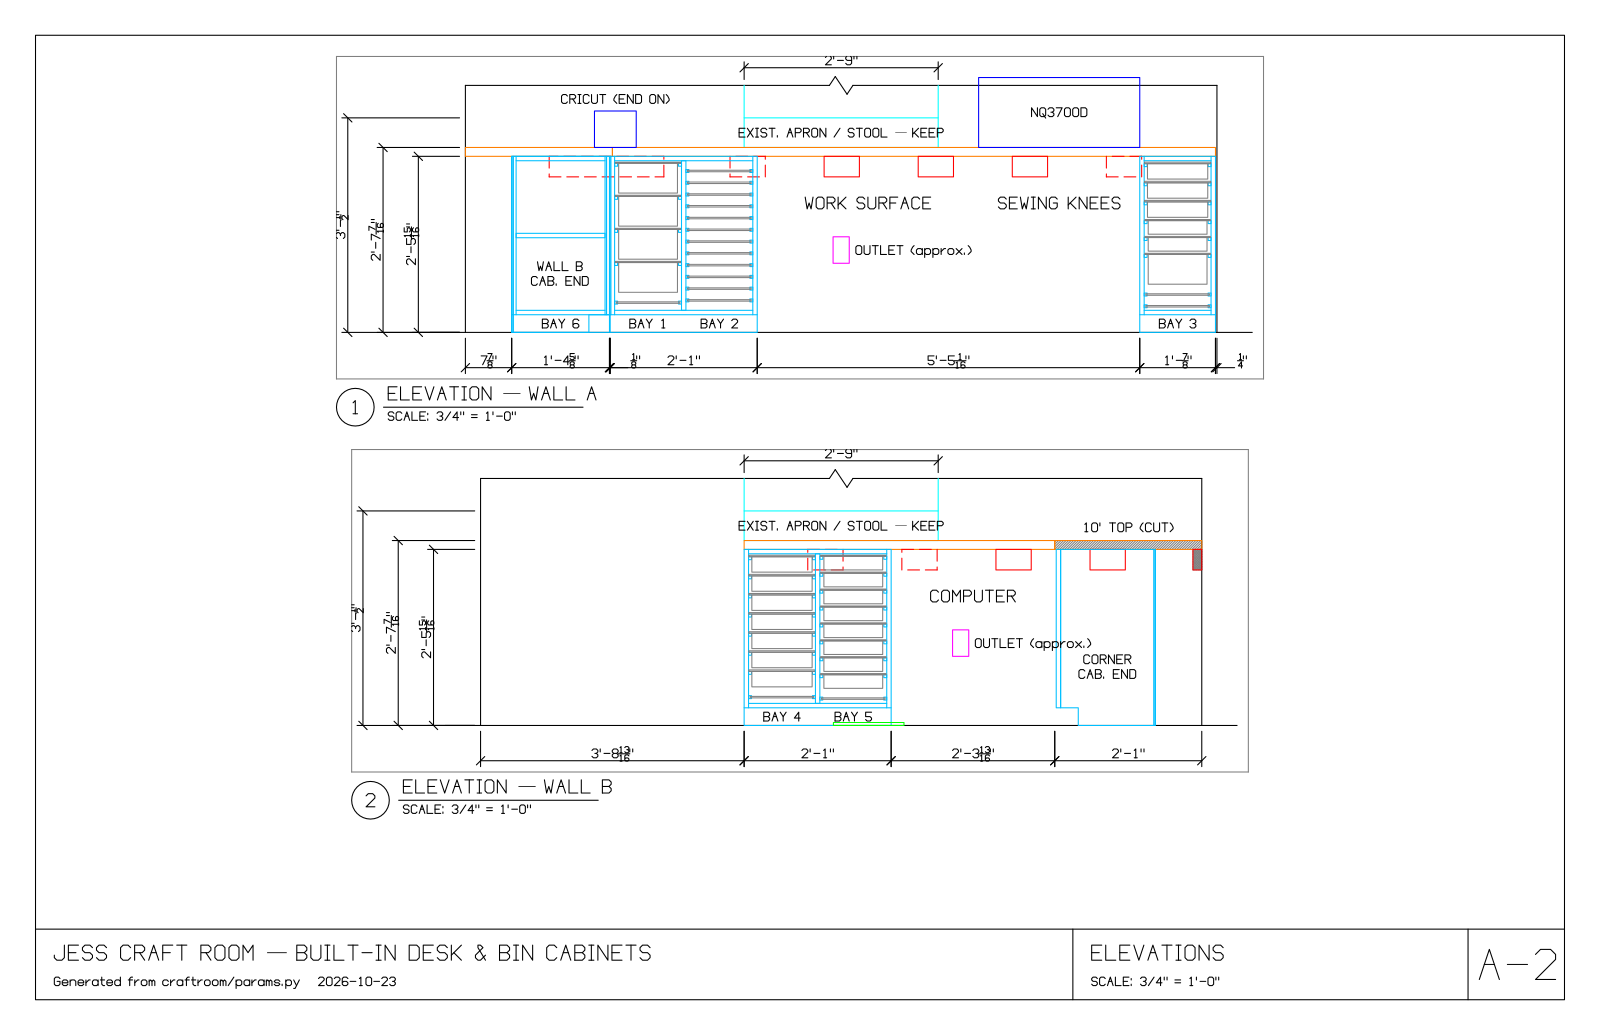
The work surface sets everything else. Jess is about six feet tall and works seated, so the top of the butcher block lands at 317⁄16 in., exactly the bottom of the window aprons. The trim stays put, the top slides under it, and the underside at 2915⁄16 in. leaves real knee room.
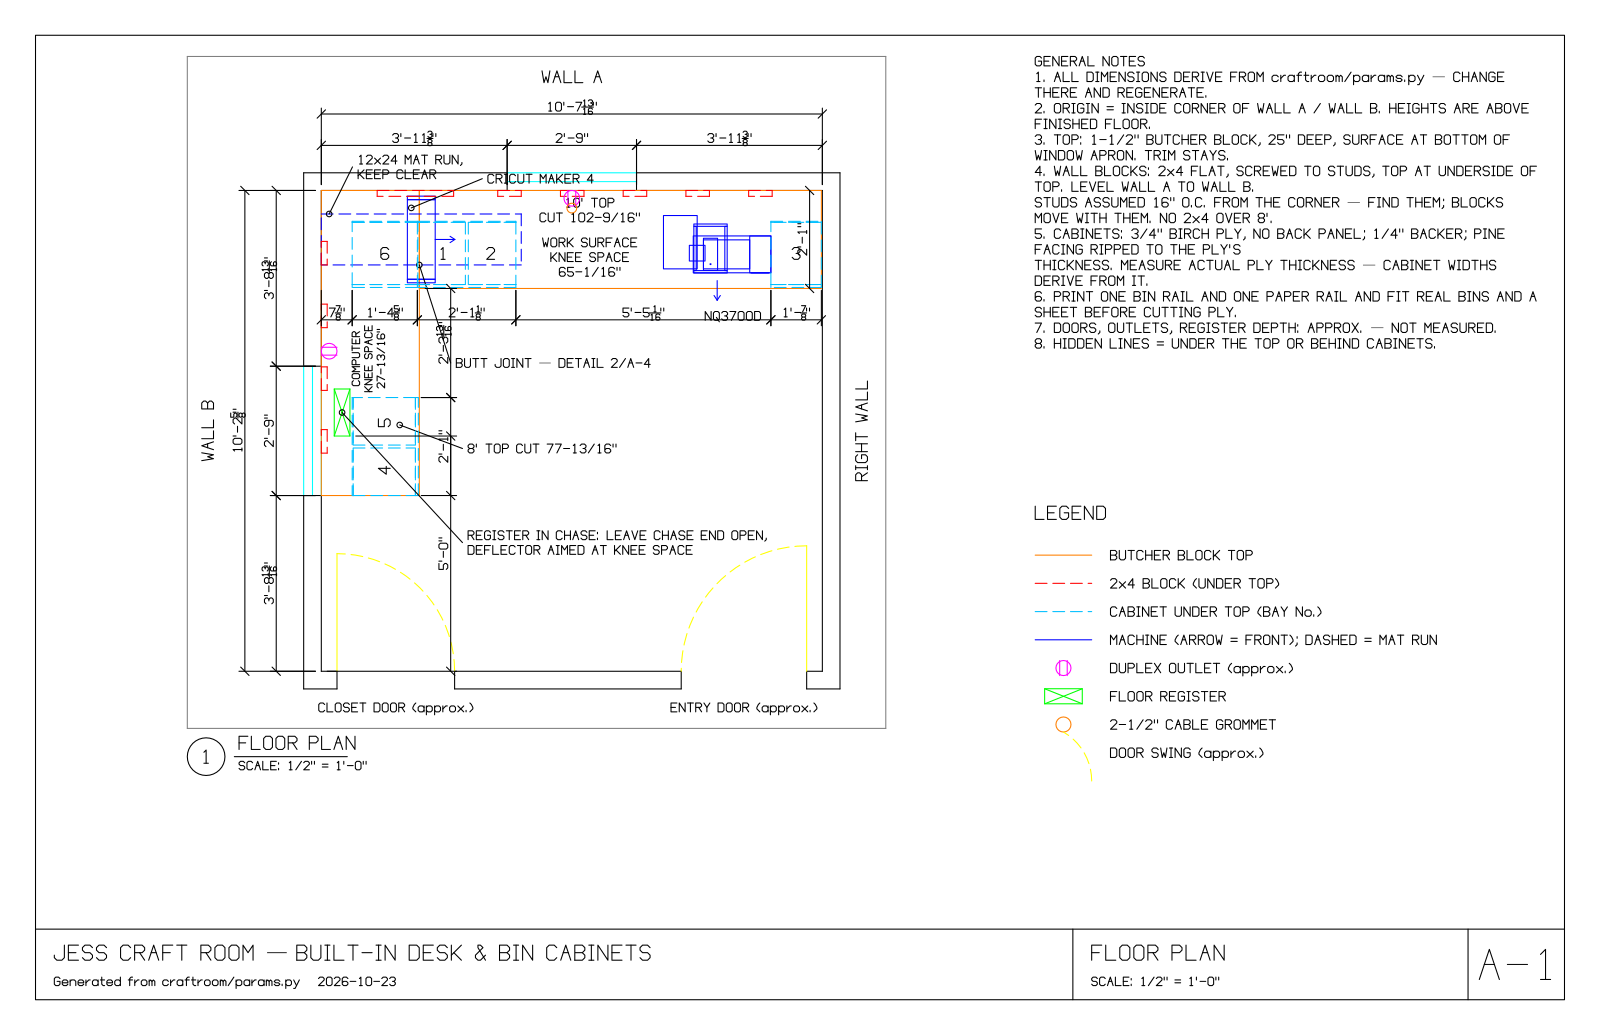
The long wall is where the work happens. The Cricut sits at the corner end, turned sideways so its 12×24 mat runs along the wall instead of into it: out the back over the open corner of the top, out the front over the work surface. The NQ3700D sits at the far end with knee room under it for sewing and its supplies in a one-bay cabinet at arm’s reach. Between them is 651⁄16 in. of open butcher block under the window. The short leg along Wall B is the computer desk, with the third cabinet at its end. Tucked into the corner under the 8-ft. top is a fourth, plain cabinet: one 151⁄8 in. bay with a fixed shelf, for the laptop bag, spare laptops and keyboards that only come out for work trips. (Full-size keyboards are about 17-1/2 in. long; they go in on edge.)
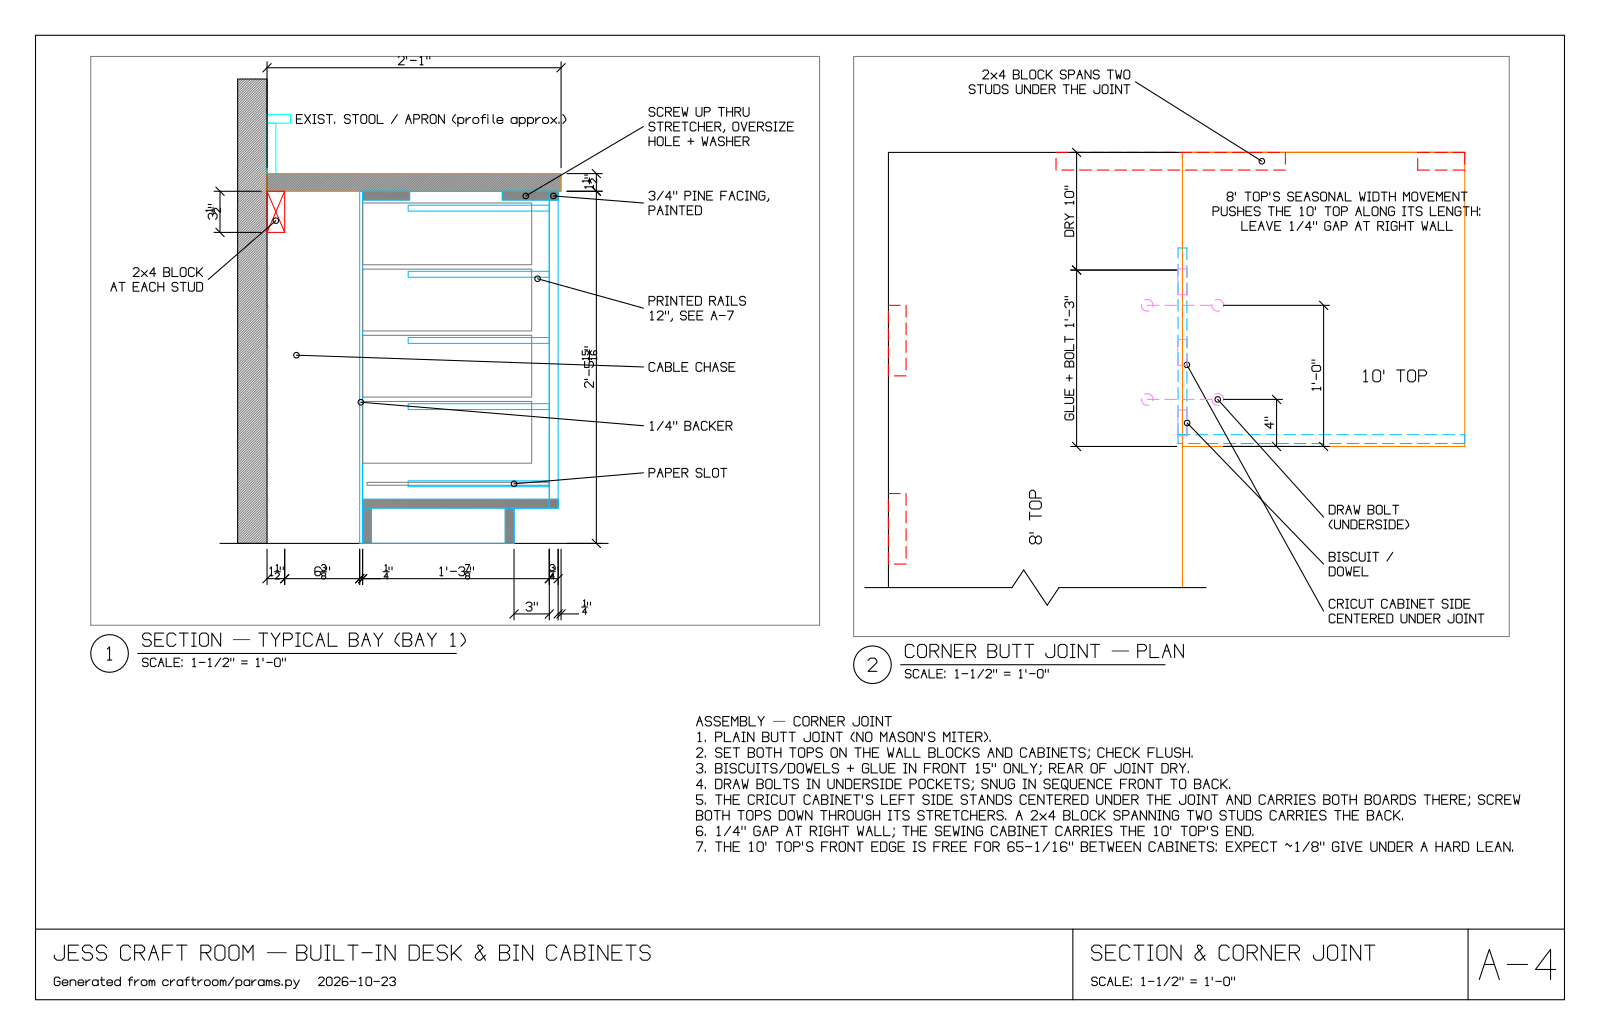
The cabinets don’t touch the wall. Their painted faces sit 243⁄4 in. out, 1⁄4 in. behind the edge of the top, which leaves a 63⁄8 in. chase behind each one for power strips and cables. The Wall B cabinet’s chase hides the floor register, which is why the hood exists.
The work wall, to scale
Walk around it
Drag to orbit, scroll or pinch to zoom, right-drag to pan. The views put the camera where she would sit.
The 3D view needs WebGL, which this browser has turned off.
Hang the bins on printed rails
Each bin rides on its lip. The body drops between two rails with 1⁄16 in. to spare on each side for teal and 3⁄16 in. for the colored bins, and the lip rests on top. Every bin gets 3⁄8 in. of clear space under it. That is enough for a loaded bin’s bottom to sag, for a rail set a hair off, and for the bin to dip a little as it comes out. More gap isn’t better: a bin pulled past its middle tips until it touches the one below, and a bigger gap lets it tip further and catch on the way back in.
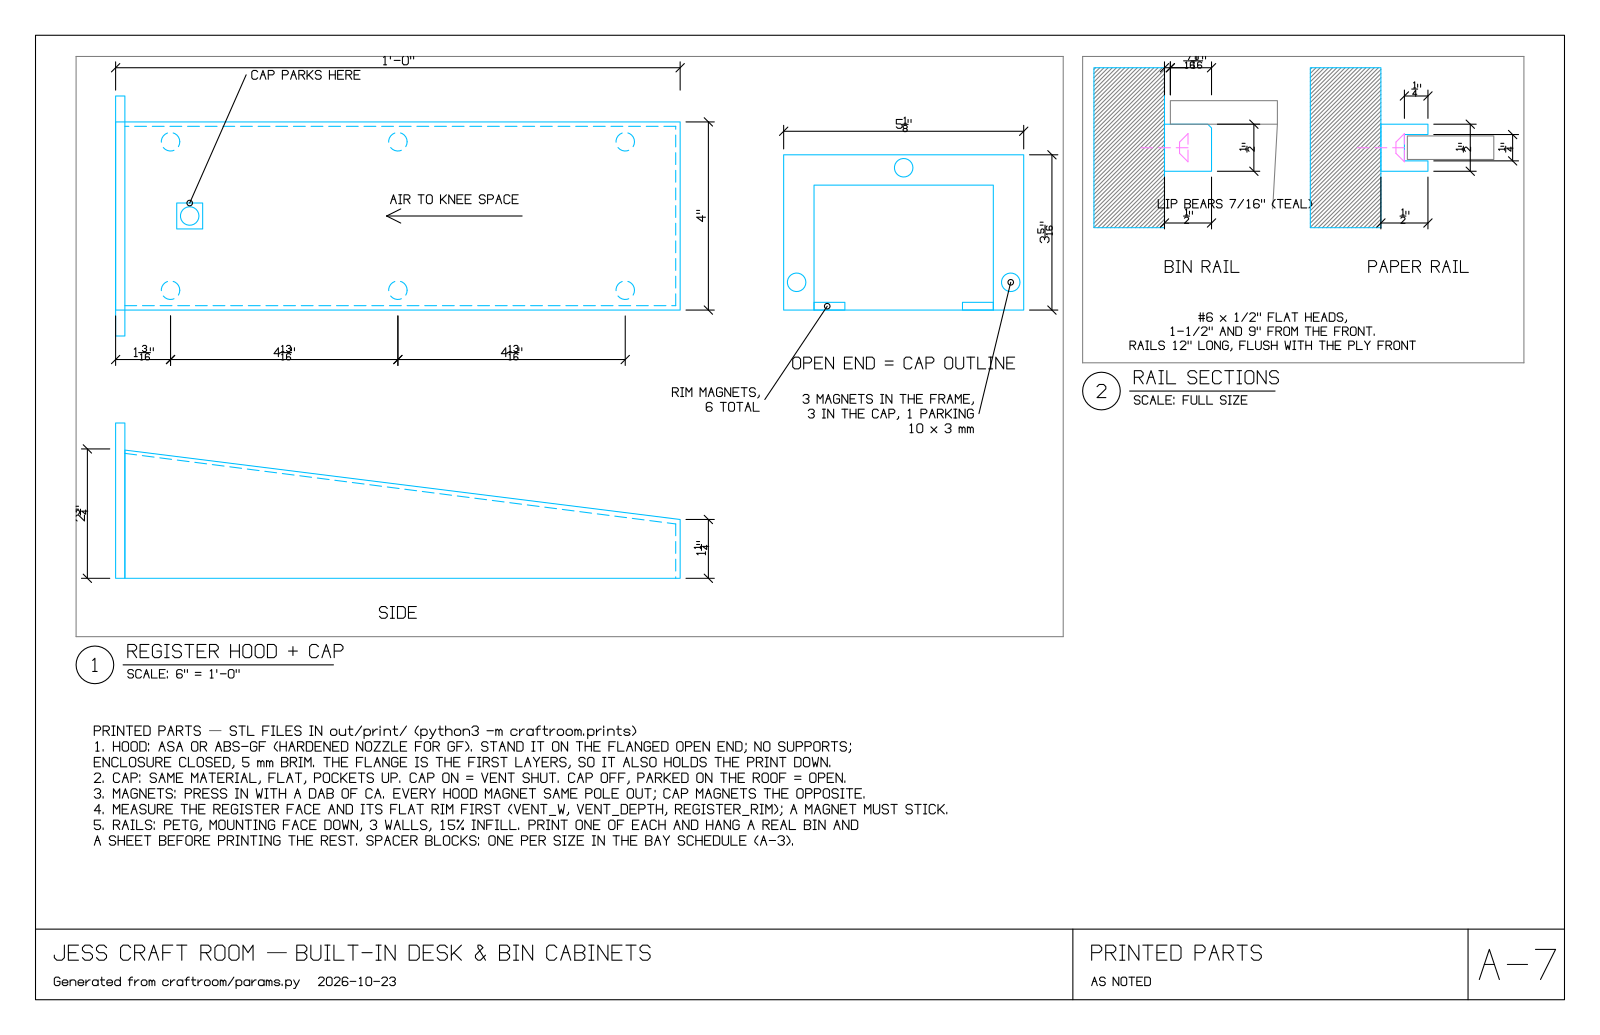
The rails are printed, 12 in. long, and screw on flush with the front of the ply. They don’t need to run the full depth. A bin tips out when the front end of the rail passes its balance point, so the back few inches of a 151⁄4 in. bin can hang free. Two #6 × 1⁄2 in. flat-head screws hold each one, seated 1⁄4 in. above the ply so that rails on both faces of a divider never meet in the middle.
Whatever height is left under the bins in any bay becomes paper shelves: grooved rails that take a 1013⁄16 in. × 151⁄2 in. sheet of ¼-in. ply every 2 in. Bay 2, right beside the Cricut, is all paper: 12 shelves for cardstock and vinyl. The sewing cabinet takes the small bins for notions. The grooves are printed rather than routed because the painted facing would close off the front of a dado, and the sheet has to come out through it.
Clearances, as drawn
| Bin | Under bin | Body to rail | Lip to side | Lip bearing | Behind |
|---|---|---|---|---|---|
| Teal | 3⁄8 in. | 1⁄16 in. | 1⁄16 in. | 7⁄16 in. | 5⁄8 in. |
| Shallow | 3⁄8 in. | 3⁄16 in. | 1⁄8 in. | 3⁄8 in. | 11⁄2 in. |
| Deep | 3⁄8 in. | 3⁄16 in. | 1⁄8 in. | 3⁄8 in. | 11⁄2 in. |
Bay schedule (rail tops above the floor)
| Bay | Cabinet | Bins | Bin rail tops, top down (in.) | Paper shelves | Spacers, top down |
|---|---|---|---|---|---|
| 6 | Corner | — | — | — | |
| 1 | Cricut | 4 deep | 28-3/4" to 11-7/8" @ 5-5/8" | 1: 5-5/16" | 7/16", 3 x 5-1/8", 6-1/16" |
| 2 | Cricut | — | — | 12: 27-11/16" to 5-11/16" @ 2" | 12 x 1-1/2" |
| 3 | Sewing | 3 teal, 2 shallow, 1 deep | 28-11/16", 25-7/16", 22-3/16", 19", 16-1/8", 13-1/4" | 2: 6-11/16", 4-11/16" | 1/2", 2 x 2-3/4", 2-11/16", 2 x 2-3/8", 6-1/16", 1-1/2" |
| 4 | Wall B | 7 teal | 28-11/16" to 9-3/16" @ 3-1/4" | 1: 5-1/16" | 1/2", 6 x 2-3/4", 3-5/8" |
| 5 | Wall B | 8 shallow | 28-3/4" to 8-5/8" @ 2-7/8" | 1: 4-13/16" | 7/16", 7 x 2-3/8", 3-5/16" |
Break down the plywood, then build two simple boxes
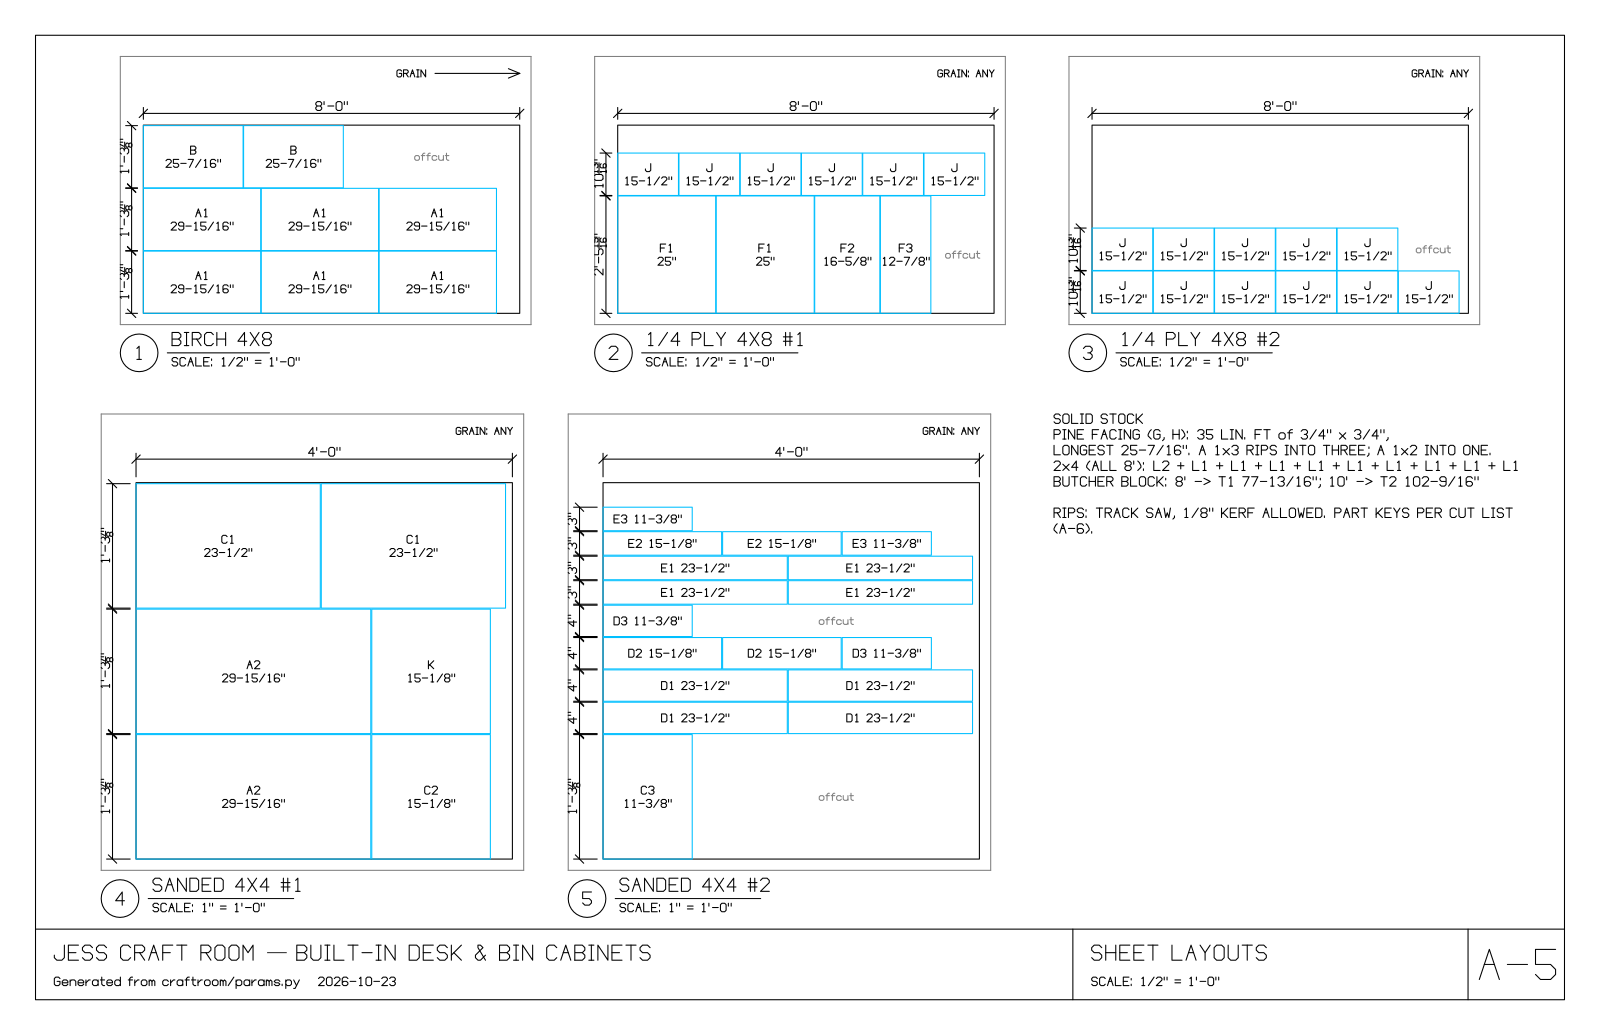
Every side and divider comes from one sheet of birch. Rip it into three 157⁄8 in. strips with a track saw and crosscut the parts from the strips; the 1⁄8 in. kerfs still leave room. Bottoms, stretchers, the toe kicks and the rear base rails come from the two 4×4 sheets of sanded ply. The backers and the 17 paper sheets come from ¼-in. ply.
Grain direction only matters where the birch shows under oil: the outer sides, which keep their grain vertical. Everything else is hidden, painted or behind bins, so it can go either way.
The carcases have no top panel and no back. Two 4 in. stretchers hold the sides square at the top, the bottom sits on the toe kick and a rear base rail, and the dividers stand on the bottom with their tops under the stretchers. The sides get a 3 in. by 3 in. notch at the front for toes.
Face it with painted pine
The facing is 3⁄4 in.-thick pine ripped to exactly the ply’s thickness and glued over every front edge, flush on both faces. It can’t be wider. Every bin lip has to pass between the stiles, and a teal lip has only 1⁄16 in. to spare on each side. Full-width rails top and bottom, stiles between them. A 1×3 rips into three strips.
Paint the strips before they go on, or mask the birch. Paint won’t stick well over Danish oil, and oil soaks into raw pine unevenly under paint. Try the oil on a birch offcut first; birch can blotch.
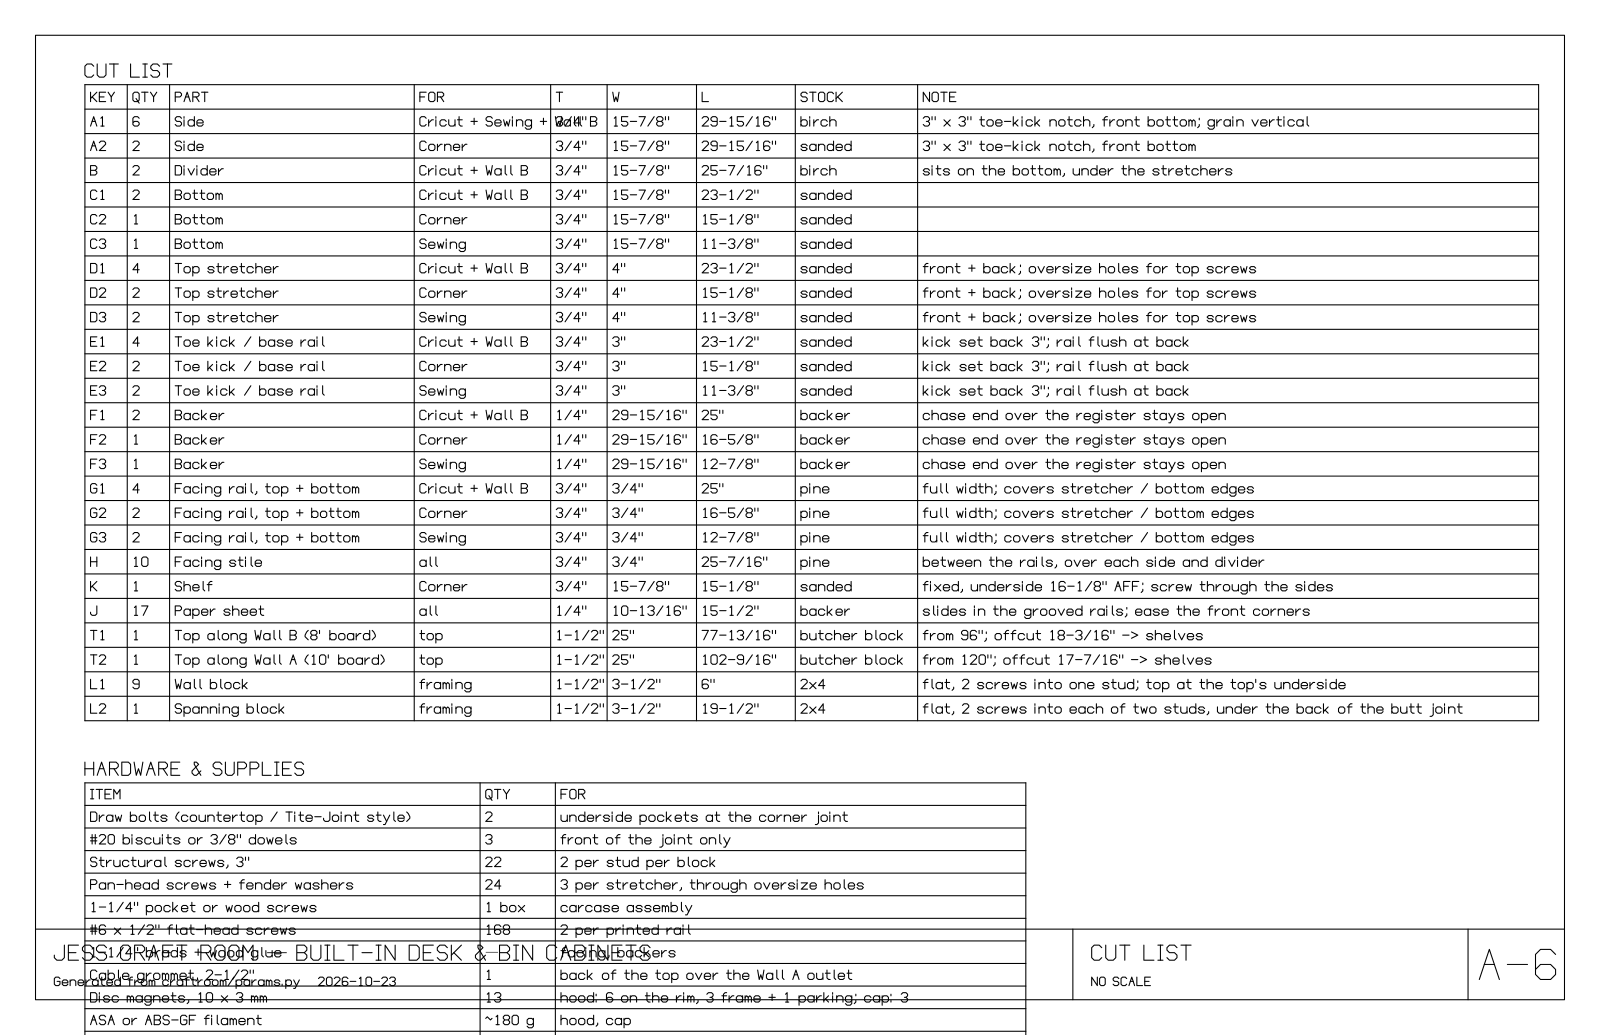
Cut list
| ✓ | Qty | Part | For | T | W | L | Stock | |
|---|---|---|---|---|---|---|---|---|
| A1 | 6 | Side | Cricut + Sewing + Wall B | 3⁄4 | 157⁄8 | 2915⁄16 | birch | |
| A2 | 2 | Side | Corner | 3⁄4 | 157⁄8 | 2915⁄16 | sanded | |
| B | 2 | Divider | Cricut + Wall B | 3⁄4 | 157⁄8 | 257⁄16 | birch | |
| C1 | 2 | Bottom | Cricut + Wall B | 3⁄4 | 157⁄8 | 231⁄2 | sanded | |
| C2 | 1 | Bottom | Corner | 3⁄4 | 157⁄8 | 151⁄8 | sanded | |
| C3 | 1 | Bottom | Sewing | 3⁄4 | 157⁄8 | 113⁄8 | sanded | |
| D1 | 4 | Top stretcher | Cricut + Wall B | 3⁄4 | 4 | 231⁄2 | sanded | |
| D2 | 2 | Top stretcher | Corner | 3⁄4 | 4 | 151⁄8 | sanded | |
| D3 | 2 | Top stretcher | Sewing | 3⁄4 | 4 | 113⁄8 | sanded | |
| E1 | 4 | Toe kick / base rail | Cricut + Wall B | 3⁄4 | 3 | 231⁄2 | sanded | |
| E2 | 2 | Toe kick / base rail | Corner | 3⁄4 | 3 | 151⁄8 | sanded | |
| E3 | 2 | Toe kick / base rail | Sewing | 3⁄4 | 3 | 113⁄8 | sanded | |
| F1 | 2 | Backer | Cricut + Wall B | 1⁄4 | 2915⁄16 | 25 | backer | |
| F2 | 1 | Backer | Corner | 1⁄4 | 2915⁄16 | 165⁄8 | backer | |
| F3 | 1 | Backer | Sewing | 1⁄4 | 2915⁄16 | 127⁄8 | backer | |
| G1 | 4 | Facing rail, top + bottom | Cricut + Wall B | 3⁄4 | 3⁄4 | 25 | pine | |
| G2 | 2 | Facing rail, top + bottom | Corner | 3⁄4 | 3⁄4 | 165⁄8 | pine | |
| G3 | 2 | Facing rail, top + bottom | Sewing | 3⁄4 | 3⁄4 | 127⁄8 | pine | |
| H | 10 | Facing stile | all | 3⁄4 | 3⁄4 | 257⁄16 | pine | |
| K | 1 | Shelf | Corner | 3⁄4 | 157⁄8 | 151⁄8 | sanded | |
| J | 17 | Paper sheet | all | 1⁄4 | 1013⁄16 | 151⁄2 | backer | |
| T1 | 1 | Top along Wall B (8' board) | top | 11⁄2 | 25 | 7713⁄16 | butcher block | |
| T2 | 1 | Top along Wall A (10' board) | top | 11⁄2 | 25 | 1029⁄16 | butcher block | |
| L1 | 9 | Wall block | framing | 11⁄2 | 31⁄2 | 6 | 2x4 | |
| L2 | 1 | Spanning block | framing | 11⁄2 | 31⁄2 | 191⁄2 | 2x4 |
Dimensions in inches, finished size. A letter that comes in several sizes is numbered largest first (C1, C2, C3). Facing: 35 lin. ft., longest piece 257⁄16 in.
Fig. 5 · Cutting diagrams. Strips are rips; parts are crosscut along them. Sheet A-5 has the dimensioned CAD version.
Blocks first, then cabinets, then the tops
- Snap a level line at 2915⁄16 in. on both walls and check that Wall A and Wall B agree. Screw a 6 in. 2×4 block flat to every stud with its top on the line, two screws each. Nothing is longer than 8 ft.
- Where a load lands between studs, use one longer block that spans the stud on each side. Here that is only under the back of the butt joint on Wall A.
- Set the Cricut cabinet with its left side centered under the joint line, 245⁄8 in. along Wall A. That side carries the inside corner of the L, so no rail is needed there. Set the sewing cabinet with its right side 1⁄4 in. off the right wall, and the Wall B cabinet with its far end flush with the end of the 8-ft. top. Pull all three carcase fronts out to 24 in. from the wall; the facing adds 3⁄4 in.
- Slide the corner cabinet in last: its left side 77⁄8 in. off Wall B, the same chase every other cabinet keeps, and 1⁄8 in. short of the Cricut cabinet. Its sides are sanded ply since nobody sees them; screw its shelf in at 161⁄8 in. to the underside.
- Leave the backer off the knee-space end of the Wall B cabinet’s chase. The floor register sits in that chase, and the open end is where its air comes out.
Join the tops with a plain butt joint
The 8-ft. top runs along Wall B through the corner and stops at the far edge of window B’s trim. The 10-ft. top butts into its front edge and runs to the right wall, stopping 1⁄4 in. short. That gap matters: the 8-ft. board moves across its width with the seasons, and that movement pushes the 10-ft. board along its length.
Biscuits or dowels keep the two faces flush. 2 draw bolts in pockets on the underside pull the joint tight. Glue only the front 15 in.; the rear 10 in. stays dry so the boards can move. Screw the tops down through the stretchers using oversize holes and fender washers for the same reason.
Print a hood for the floor register
The register ends up inside the Wall B cabinet’s cable chase. Left alone it would heat the back of the cabinet. The hood sits on the register’s steel face, closed at the far end, open toward the knee space. Its roof climbs from 11⁄4 in. at the closed end to 23⁄4 in. at the outlet, so the passage gets bigger as more air joins it, and a fillet in the closed end turns the air without a dead corner.
To shut it off, a flat cap snaps onto a flanged frame around the open end with three magnets. When the vent should run, the cap parks on a magnet on the hood’s roof, so it doesn’t wander off. A butterfly damper was the other option, but a blade at the mouth would sit in front of the first louvers, and those would keep blowing. The cap seals the whole outlet.
6 more magnets sit in pads that bear only on the register’s flat rim, never on the louvers. Every magnet in the hood goes in with the same pole out, and the cap’s with the opposite pole.
Print settings
| Setting | Value |
|---|---|
| Models | out/print/deflector_hood.stl, deflector_cap.stl |
| Size | 305 × 130 × 84 mm |
| Orientation | Hood standing on its flanged open end; cap flat, pockets up |
| Supports | None (pads are chamfered 45° toward the bed) |
| Walls | 6 perimeters at 0.4 mm (2.4 mm) |
| Material | ASA or ABS-GF, enclosure closed; hardened nozzle for GF |
| Adhesion | The flange is the first layers; add a 5 mm brim for ASA |
| Printer | Fits a Bambu H2D (325 mm build height) |
The drawings
These are the shop drawings from CADCraft, unchanged: ANSI B sheets with every view generated from the same parameter file as the illustrations above. Open any sheet for the full-size drawing.